If you’re here then this may be true that you’re facing an error saying “VAC was unable to verify your game session” while trying to play the CS: GO. What’s this error means how can you solve this, here we will going to tell you about the solution for this error which keeps on popping up on the screen and won’t let you play the game peacefully.
So if you’re also finding a way to solve the error VAC was unable to verify your game session then you must read the full article and all the methods we share below doing which you may overcome the error and solve the problem. This error usually appears on the CS: GO game screen while a player trying to matchmake.
Just follow the steps or methods given below and you can solve the error easily and be able to play the game once again without any error.
Table of Contents
Methods to fix VAC was unable to verify your game session
Below are some of the methods which you can use to solve the issue “VAC was unable to verify your game session” while matchmaking in CS: GO.

Method 1: Repair Steam Client
Maybe the error is occurring because your Steam client is corrupted and to fix this you must have to repair your Steam client and to do so you have to follow the steps below:
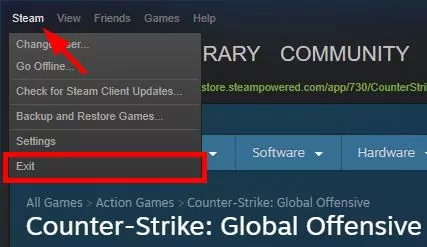
- Open the steam client and click on the upper left corner mark as “steam” and then select the exit.
- Then select the Windows start button on the lower left corner of your screen and search for “cmd”.
- After selecting the CMD option your PC will ask you for permission you’ve to select “Run as Administrator”.
- Then type the following command or just copy paste it: “C:\Program Files (x86)\Steam\bin\SteamService.exe” /repair. Then press enter.
- After that try to run your Steam Client and launch the game again ad check if it fix the error or not.
Method 2: Verify the Game Files
There is a possibility that the error is occurring because of your game files. So you need to recheck and verify them through your Steam client. Just follow the steps below to do so:
- Click on the Library option on your Steam Client screen.
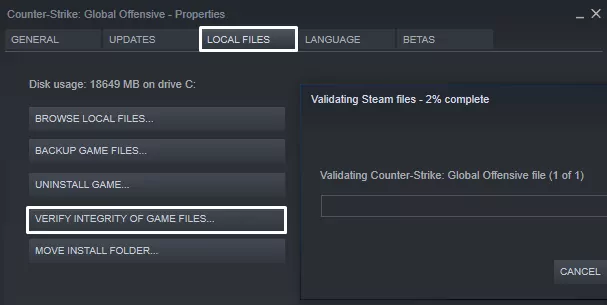
- Right Click on the game option “Counter-Strike: Global Offensive” and click on the propeties.
- Select the local files option appearing on your screen then click Verify integrity of game files.
- Then wait for the process to complete after that close the tab.
- Now try relaunching or starting the game and see if the error solved or not.

Method 3: Restart your Steam Client
There may be a possibility of some corrupt files in your Steam client and to solve that you must have to restart your Steam Client. And to do so follow the steps below:
- Click on the upper left corner of your client named as Steam and then click on Exit.
- Restart your Steam client or open it again.
- Again select the upper left corner Steam option then click on Go Offline option.
- Now a windows pop up on your screen select Restart in Offline Mode.
- Again select Steam option on upper left corner then click on Go Online.
- A new windows will pop up on your screen now select Restart and Online.
- Now try to launch your game and check for the error.
Method 4: Update your all Drivers
Not updating your drivers from time to time can be a serious problem while operating games or other stuff as we will see several different errors. So it is necessary to keep your files and drivers up to date. There are many online software that you can download to check and update for your driver updates.
One we’re taking here is Driver Easy which you can download for your PC by clicking on the link. You can also do the update task manually but it is quite difficult to do so. To update your Drivers using Driver Easy follow the steps:
- Download and Intall the Driver Easy Setup by click Here.
- Run the app and click on the Scan now option to check for the drivers to be update.
- Then click on the option Update.
- This app will automatically start suggesting you the lastest drivers for your PC and update all.
So this is all there are other few methods also but you can easily solve your “VAC was unable to verify your game session” error issue by following the steps above.
Also Read: Undoing Changes made to your Computer Fix: Simple Methods to fix it


![500+ Best Name For YouTube Channel for Gaming Free Fire [FEB 2024] Name For YouTube Channel for Gaming Free Fire](https://www.aspartin.com/wp-content/uploads/2024/02/Best-names-for-youtube-channel-for-Free-Fire-gaming-450x253.jpg)